Search This Blog

Sunday, November 10, 2013

2 ingredient Pineapple Cake

Well, I did it. I gave in to all my skepticism and doubt. I made a two ingredient cake. 

This concept, to me, goes against every baking law. I am in no way a baker. I have baked a cake from scratch once in all of the years the offspring has been on this earth. That cake, which I had to use a candy thermometer for, was a pink lemonade cake that she begged for. It had multiple steps of whipping and folding and separating and cooling only to heat and fold again. Most of  those crappy stupid steps I had to look up because I didn't know what they meant for me to do. What is the difference between folding and stirring and why if I stir when I need to fold will it end up a disaster? Seems a little high maintenance to me. 

This cake and I were like a dating couple. Sounded perfect at the start. Had all the right ingredients. But was hard work and fragile in order to make it right and successful. Plus, I got NO help from that cake. It was all in ME! Lazy, selfish, needy bastard cake. 

By the time I was done cooking the blasted thing I decided the relationship I had formed with it wasn't going to work out and wrote it a "Dear John" letter. I didn't even want to try it. I needed my space. 

The offspring thought it was amazing. she thanked me for all my hard work, bloodshed and tear loss by only eating ONE PIECE. ONE fricken piece of that cake! One piece!?! I vowed never to bake something so involved ever again. If it calls for a candy thermometer and has more than 5 steps then nope, not gonna do it. I swore off baking in general, unless it was a ready dough, forever!

But these two ingredient cakes sounded too good to be truly. I have watched enough bakers, growing up and on TV, to know the key ingredients of a cake are needed for its survival. Omit or use not enough oil and you end up with a dry, crumbly cake. Omit or forget an egg or two and the cake will be dense and flat. Like a hockey puck. So how can omitting these ingredients all together going to work out and form a cake you can actually eat? Gotta say, I set out to prove it wrong more than I wanted to have a delicious final product.

So we begin....

         Two ingredient Pineapple Cake


Ingredients:
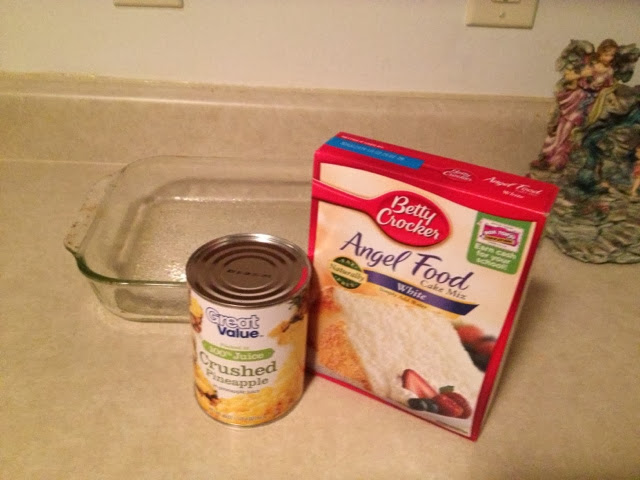
~1 box Angel Food Cake mix
~1 20oz can Crushed Pineapple (do not drain!) also make sure it is in it's own juice and not a heavy or light syrup.

Heat your oven to 350*F

I started by spraying my 9X13 glass baking pan with a nonstick cooking spray. I then floured the 9X13. The original recipe didn't tell me to do either of these steps but my mom did. She has baked many many amazing cakes in her day. So I followed her advice.

In a mixing bowl empty the entire pouch of the Angel Food cake mix. As you mix the batter with expand quite a bit. Make sure you use a large mixing bowl. Then add the can of crushed pineapples. Do not drain it first. You need the juice.

Next, stir the mixture. Do not mix with a hand mixer. You should mix this by hand.  Using amything else would pulverize the pineapple and ruin the entire cake.

Once mixed thoroughly, transfer to 9X13. Your finished product should look like the picture below.

         Fluffy, pineappley, yumminess!

It is loaded with pineapple. It was really hard not to eat the batter! Especially since it didn't contain raw eggs and was safe to consume!!

        So much pineapple yumminess!!

Bake for 30 minutes. And enjoy!

             Fluffy, moist, amazingness 

Try to hold yourself back and allow it to cool before you attack and devoure it. 

I admit, I was so wrong. You can make a wonderful, moist, fluffy cake with just two ingredients. I am pretty sure witch craft is involved somehow. Or that by baking this you have lost your soul to the devil. But it is pretty good!

As I said above, it was moist and fluffy. You can really taste pineapple in every bite. I think next time I might fold in pineapple tidbits just to increase that flavor even more. I LOVE pineapple. You may think that is over powering and choose to omit that step and just stick with the called for amount of pineapple. Either way it is a pretty good cake that can't make baking any easier. I look forward to making more two ingredient cakes.

And that is what is for dessert!
  

Thursday, November 7, 2013

Hamburger Stroganoff

Sorry I haven't posted in a week or so but I haven't done any cooking worth blogging about.

The offspring was gone for her every other weekend visitation this past weekend. I would love to say things have improved there but I guess something that has been awful for 14 years is never going to change. It breaks my heart. She is such an amazing child filled with compassion and beauty. She deserves so much better. 

On the weekends she is gone I don't cook. In fact I spent this particular weekend eating toast and Lean Pockets...don't judge. I love Lean Pockets. 

The rest of the week we haven't done much. We had frozen pizza one night. McDonald's another. Yes, I know. I broke my vow of no more fast food. But it is so convenient! 

Finally, last night I cooked! Sadly, the recipe kind of sucked:(

But I vowed to blog the good, the bad, and the ugly...so here we go!
                
                   Hamburger Stroganoff

Ingredients:
~1 pound ground hamburger (you could probably use ground turkey too if you want to be all healthy about it)
~4 Tbsp. butter
~1 cup diced onion
~1 clove garlic
~2 Tbsp. flour
~1 tsp. salt
~1/4 tsp pepper
~1 can Cream of Mushroom soup (original recipe called for can of Cream of Chicken soup. I'll explain below why you shouldn't use this.)
~1 cup sour cream
~1 8oz can sliced mushrooms (optional)
~egg noodles

I cooked my egg noodles first. I have an electric stove, which I am pretty sure is from the 1800's, and it only has 1 large burner. Does anyone really use the small burners? So I always cook noodles first. 

Next, sauté the onions and garlic in a pan. Once those are done add the hamburger and brown. When finished do not drain the grease! I had a huge urger to drain the grease off but you need it for the next step. Don't worry you will get the chance to suck up that nasty fat.

Next, stir in the flour, salt and pepper. Also add the mushrooms at this time if you are using them. The flour will absorb most of the grease which is why you need to wait to drain it. Let this mixture cook until it looks well blended. Now you may drain off the excess grease. 

Next, add the can of soup. The original recipe I found calls for a can of Cream of Chicken. This confused me greatly. I added it just because that is what the recipe called for. Since I am not a trained cook it didn't dawn on me that this was going to be a bad move until I ate the finished product. I should have went with my gut and used Cream of Mushroom. I highly recommend that is what you use.

Let this mixture simmer for about ten minutes or so. You want the soup to thin out a bit. Your mixture should look like the picture below. I had to drain off more grease at this point too because I used cheap hamburger. In fact it is called ground burger and not ground beef. I find this amusing. Hey, when you are poor and on a severe budget you have to choose between burger and beef. What's the harm? It is all cow...just one probably contains ground up tail and other questionable parts.

       Burgery, mushroomy, soupy fun

Lastly, add the sour cream. Cook long enough to heat the mixture through.

It won't look much different than the picture above but I'll add the picture anyway. 
     Told ya so! Looks roughly the same

Serve over egg noodles and enjoy! (Hopefully😐)

Like I said, I was not a fan of this recipe. I don't think the offspring was either but she is too sweet to actually say so. I probably won't make it again. Because I used the Cream of Chicken, as the original recipe called for, it had chunks of chicken in it. Which for a hamburger and mushroom dish that just doesn't jive well. It also had a strong Cream of Chicken soup flavor. You could barely taste the sour cream, which is what I LOVE about stroganoff. 

This recipe might be doable with some modifications. Such as using the Cream of Mushroom soup. I am just not experienced enough in the kitchen to tell you what those modifications might be. I would love feedback if you've got it. 

And that is (sadly) what is for dinner!

I am going to freeze the leftovers just in case the zombie apocalypse happens and we need food. Never know....


Friday, November 1, 2013

Pepper Jack Mac & Cheese

Hot dogs and mac & cheese on Halloween night is a tradition from my childhood. Ever since I was old enough to eat solids and probably long before that, my mom made this halloween meal. I passed this ritual on to my own family. Mom was right. Hot dogs with mac & cheese is something fast and simple to make while trying to lasso kids into costumes, paint faces, curl hair and do anything else that pops up amidst the Halloween chaos. 

Even though my baby is too old to trick or treat I still decided to make the traditional Anderson Halloween meal. Only I made a more classy mature recipe to reflect passing into a new era of no trick or treaters in the home.

I probably will never buy boxed mac & cheese again.

        Pepper Jack Macaroni and Cheese

Ingredients:
~3 cups elbow macaroni
~6 Tbsp. butter
~4 Tbsp. flour
~1/2 tsp. garlic powder
~1 tsp. salt
~1/2 tsp. ground pepper
~1 cup sour cream
~2 1/2 cups 2% milk
~3 cups shredded Pepper Jack Cheese
~1 cup shredded Sharp Cheddar Cheese

Preheat oven to 350*F

Boil elbow macaroni to al dente. I have no clue what al dente is suppose to taste like. I just cook the pasta until it doesn't taste raw when I take a noodle out of the boiling water to test it. So cook the noodles until they are done to your liking.

Once your noodles are done, drain them and set them aside. 

In the hot pot you cooked you noodles in (no need to dirty more pots than necessary) melt the butter and sprinkle in the garlic powder. Once this aroma hit the air I felt like some fancy cook. It smelled so yummy.

Next add the flour and salt & pepper and whisk until smooth. This takes a good minute. According to my mother this mixture is called a Roux. According to google.com a Roux is a mixture of a fat, usually butter and flour. It is used as the base for most sauces. Good to know.

After you have a nice buttery Roux add the milk and sour cream while whisking. Keep whisking until it thickens. I would love to tell you how long this takes but I am an idiot and missed this step while cooking. I had to go back and add it after I added my cheese. It did take a good 3-4 minutes for everything to melt and thicken after I had all the right ingredients in the pot. Hey, what can I say? I am learning as I go.

After you have a thick milky concoction add 2 cups of the Pepper Jack cheese and 1 cup of the Sharp Cheddar. Keep stirring until this mixture is a smooth cheesy mixture. Now would be a great time to insert a picture of what that cheesy sauce should have looked like but, I was so excited that it was turning out how actual homemade mac & cheese should that I just dumped the noodles in and forgot to take a picture:( Sorry. 

Which brings us to the next step. Dump your noodles in and stir it up. Mix it really well. Make sure all your noodles get coated. I took time during this step to add smoke sausage that I had cut into cubes. You could add any type of meat here if you wanted. Or just leave it meatless. Who cares! It is your mac & cheese!

Now transfer your pot of peppery cheesy love into a baking dish. I used an 11X13 dish. It makes a nice big healing dish full.

Sprinkle the remaining 1 cup of Pepper Jack cheese over the top. I also added some Sharp Cheddar to this step too. Can you have too much cheese? Um, NO! 

Bake for 20-25 minutes. And voilà! Homemade mac & cheese!

Look at those smoked sausage chunks! Yum!!

This is a basic macaroni and cheese recipe. You can change the cheeses to any kind that your family likes. The Pepper Jack gave it a nice little kick that we loved. The sausage was also a nice addition. But again you can tailor this recipes to your family's likes and dislikes. Hopefully, this will take the place of boxed mac & cheese in my home. 

And that is what is for dinner!